4 Pro-Tips for Creating Better PLC Sequencing Logic
Oct 25, 2022If you've programmed PLC applications before, chances are that you have worked with step sequences.
In it's most basic form, a step sequence will transition from one step to the next if one or more conditions are met. A series of step sequences could look something like this:
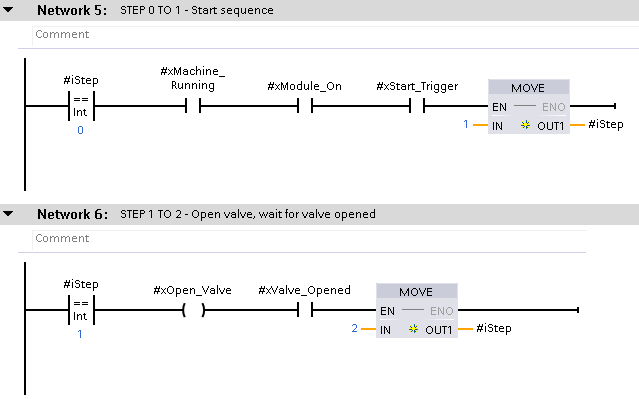
In the above example, we transition from step 0 to step 1 if the conditions "machine running", "module on", and "start trigger" are all true. In step 1 we open a valve and wait for the valve open feedback before we transition into step 2. This is an example of a basic setup of a step sequence.
Now, if you're serious about building better, more reliable sequences, then I've got something special for you today. Here are 4 tips to take your sequencing logic to the next level.
TIP 1: Make sure every step of your sequence is active at least one scan cycle
BENEFIT: No steps are skipped which leads to more reliable logic that is less vulnerable to faulty programming and easier to read while tracing (monitoring)
In our example above, let's assume that the valve is already opened before starting the sequence. Now when we start the sequence and get to step 1, we will transition directly into step 2 (because the condition xValve_Opened is true). If you would make a time trace of iStep, you would see a transition from step 0 directly to step 2. Step 1 gets lost because it is not active for at least one scan cycle (and the fastest recording speed of a trace every scan cycle).
By building a sequencing standard that processes each step at least one scan cycle, you avoid jumping over steps.
You can secure a minimum of one scan cycle for each step in 2 ways:
- By building a small time-delay for each sequence
- By setting an initialization bit on the rising edge of each new step and by resetting this bit (important!) after your sequencing steps
The second solution is my personal favorite due to it's simplicity. Below is an example of how step 1 can be improved using this solution.
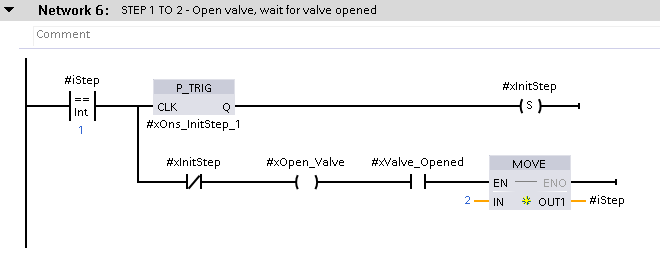
So when we are entering step 1, we set the initialization bit (xInitStep). Just remember to reset this initialization bit after your last sequence (no conditions, just reset).
Even if the valve would be opened already when entering step 1, we would still stay in step 1 for one scan cycle before transitioning into step 2 because we have to wait for the xInitStep bit to be low again.
Apply this to all of your steps, and you'll never skip a step again.
TIP 2: Monitor each step by building a variable timeout for each step
BENEFIT: Improved quality control of each step of your process
If you have experience with sequences, you will probably have experiences with being stuck in one. When this scenario happens on a running machine or line, the customer will most likely call you and tell you (in a slightly aggravated tone of voice) that his machine is not reacting anymore. Pressing buttons doesn't work, resetting alarms doesn't work. The only thing that works is a power cycle of the whole machine.
Well, most likely the machine is stuck in a sequence somewhere (which could explain why a power cycle fixes the problem, because the sequence is typically reset in the software after a power cycle).
Can you guess how to solve this problem? How do we prevent sequences from getting stuck?
Structured programming will surely help here, but if you want to make sure that you don't get those customer calls in the middle of the night, creating a timeout alarm for your sequence is an essential step (no pun intended).
Here's what you can do:
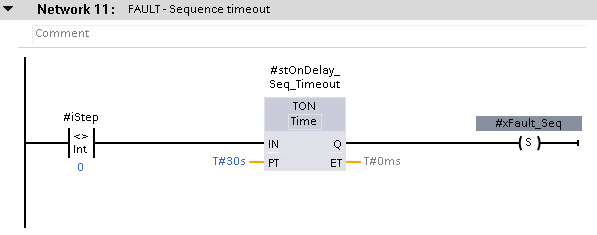
- Option 1 - Create a timeout alarm for your sequence, and use one fixed monitoring time (e.g. 30 seconds) to monitor your sequence as a whole (if step number is not "0" for x number of seconds -> set timeout fault). This is how most PLC programmers implement a timeout.
- Option 2 - Same as above, but specify a specific monitoring time for each step of your sequence. This is more advanced and gives you better quality control over each step.
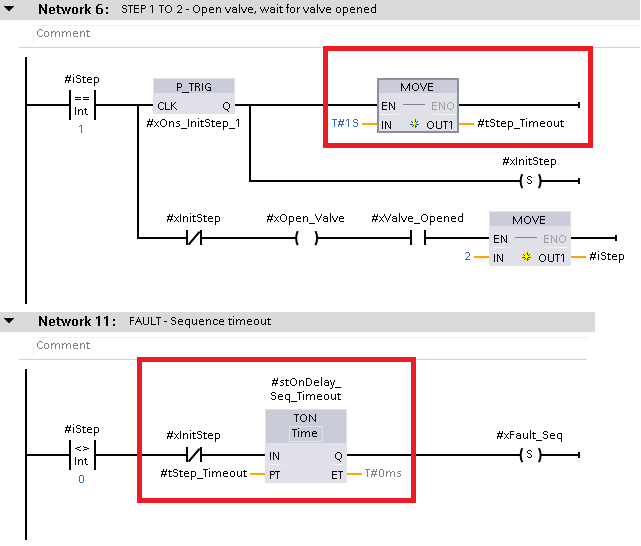
In our example above, each step can be monitored individually. Every time we enter a new step, a specific timeout time is configured. In our fault network, we restart the timeout timer every time we enter a new step (xInitStep will be high for one scan every time we enter a new step - this resets the timer).
For example - step 1 opens a valve and then waits for a valve open feedback. Here you could configure a timeout time of 1s (a fast opening valve should normally open within 1s).
The next step might start a pump and waits for a water level to reach a certain height. This could maybe take 10 seconds, so you could configure a timeout time of 15 seconds for this step.
Can you see the advantage in adding this feature to your sequence? Great, let's go to the next tip!
TIP 3: Avoid step-comparing conditions to trigger actions outside of the sequencing
BENEFIT: Logic becomes more coherent and less susceptible to faults created by lazy programming
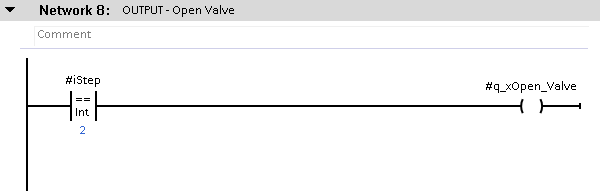
From my personal experience, using step comparisons to set outputs or trigger other actions OUTSIDE of your sequencing logic is never a good idea and will increase the risk of faulty software in the future.
I will try and illustrate this using the example below. Here we are activating a valve output by comparing the step number to "2" (= we are using a step comparison outside of our sequencing logic).
This works fine if you never change your steps. In real-life though, another programmer could come after you on-site, adding some steps and changing some of the numbering of the steps. Like this:
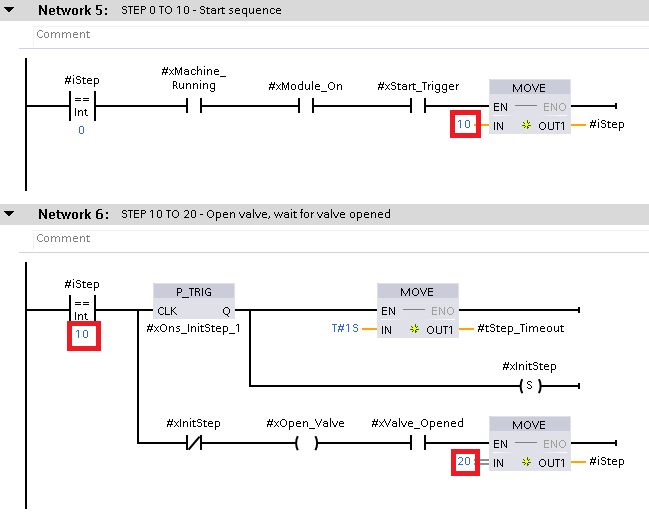
The programmer in our example above has changed the numbering of step 1 to step 10 and step 2 to step 20. If this programmer forgets to update the step number in Network 8 (where we activate the valve output), then the valve will not open at the desired step.
Do you see how this type of logic (combined with lazy programming) can lead to faulty software easily?
Now here is how you make sure this does not happen. In your sequencing steps, declare a unique "action" variable and use this variable to trigger an action outside of your sequencing logic.
In our example above, we have declared an xOpen_Valve action variable that we can use to activate the actual valve output, as such:

Now you don't need to worry anymore about another programmer changing your step numbers. We have made the valve action independent of the step number and by doing so improved our PLC application once again.
TIP 4: Integrate the step number into your module data structure
BENEFIT: Easier troubleshooting (tracing setup is easier)
If you're already building data structures for the different modules of your application (which you should!), why not add the step number in there as well?
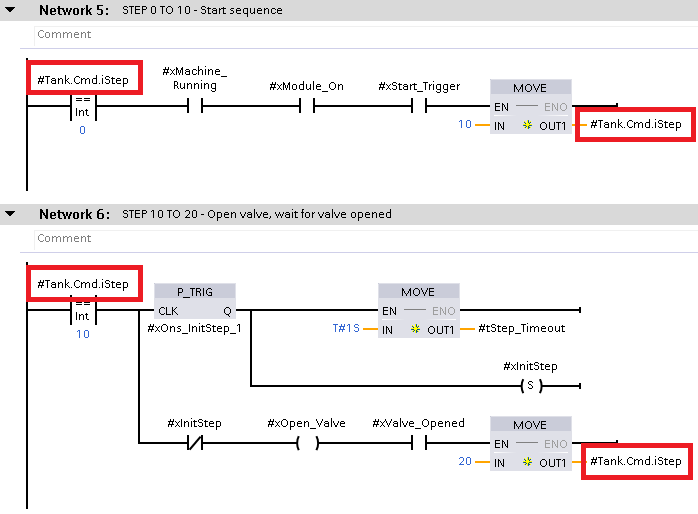
In our example, we are using the local tag "iStep" for our step number. What we can do now to improve our program, is for example to add this step number to the command structure of our module.
Our module could be for example a "water tank" module. The general structure of this module could look like this:
- "Tank".Sts for all status tags of the module
- "Tank".Cmd for all command tags of the module
- "Tank".Flt for all fault tags of the module
- "Tank".Cfg for all configuration tags of the module
If we add the step number to our command structure, our sequencing would look something like this:
If we now want to trace this module and monitor how it is behaving in runtime, we can just choose signals from our module data structure ("Tank".xxx.yyy) and we don't need to look inside any FBs or FCs for which signals to configure for our trace. Adding all of your important signals into your module data structure makes it much easier to monitor them and see the connection between them in a trace over time.
So these were my 4 tips, my 4 recommendations on how to transform your sequencing logic into a professional package and decrease the chances of faulty logic in the future.
For maximum result, combine all 4 tips and elevate your PLC programming to a higher standard.
That was it for this post, I hope you enjoyed!
-Hans
Download your FREE GUIDE NOW!
5 Simple Steps to Drastically Improve your PLC Program Structure in TIA Portal by Hans Schrynemakers
This is one of my most popular guides, and I’m happy to share it with you for free! Inside, you'll learn about:
- The #1 Way to Eliminate Messy PLC Programming in Just 5 Easy Steps!
- The Proven Method for Building Scalable, Future-Ready PLC Applications in TIA Portal.
- Discover How Modular Design and Structured Data Can Eliminate Costly Errors and Downtime.
- Break Free from Unstructured Programming - Build Clear, Modular TIA Portal Applications with Confidence.
- Master the Techniques that Separate Amateur PLC Programmers from Professionals.